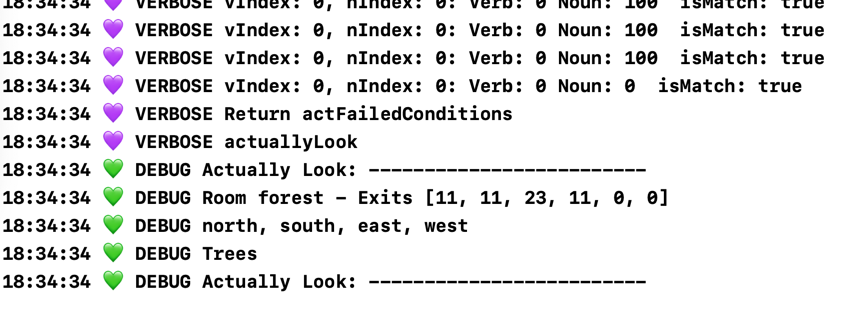

I come from a world where there are a large number of tools to help you with debugging your programs. When I got to Xcode and Swift, I was presented with LLDB (for which I still know very few commands) and using print statements. Not ideal.
To be fair, noting much has changed from those early debugging days, except I now have a much snazzier form of printing to the console in the form of SwiftyBeaver.

You can get install instructions over at github for SwiftyBeaver. For my part., I prefer using Carthage for my install, but you can pick some other way if you want.
There are two phases to using SwiftyBeaver; the set-up of the environment and the logging to the console. To get
the set-up done, you need to go over to the AppDelegate.swift file. For the purposes of our logging, we're
going to log to the console. You can log to all sorts of pother locations, but the console is the simplest
place for debugging purposes.
So, first thing we need to do is reference the library and create a global logging variable:
import SwiftyBeaver

let log = SwiftyBeaver.self
The log variable is a convenience, but a very convenient one, so it's worth the ridicule of having
a global variable!
The next bit of set-up, I usually split into a separate method:
    fileprivate func initialiseConsoleLogging() {
        let console = ConsoleDestination()  // log to Xcode Console

        // Set a custom format to get date/time and add some colour
        // indicators to the log to make spotting message level easier.
        console.format = "$DHH:mm:ss$d $L $M"
        console.levelString.verbose = "💜 VERBOSE"
        console.levelString.debug = "💚 DEBUG"
        console.levelString.info = "💙 INFO"
        console.levelString.warning = "💛 WARNING"
        console.levelString.error = "❤️ ERROR"

        // Setting the level here determines how much output we get
        console.minLevel = .verbose

        // add the destinations to SwiftyBeaver
        log.addDestination(console)
        log.info("App started and log initialised.")
    }
What we are doing here is defining the console as a destination and configuring the output. The format
determines how the output will look while the levelString is used to add some colour to the
console which makes it easier to spot messages.
The midlevel tells SwiftyBeaver what level to report at. While intensively debugging, this is usually set
to .verbose as this gives me the maximum number of messages. Once the app settles down, it
drops to .debug. For production, you might as well set it to error, since you cannot get the console
output anyway. For production, you might want to look at the paid options!
Logging is the second part of the process. That is simply a case of lobbing calls to the log object throughout your code.
let item = items.filter() {
    $0.ItemName.uppercased() == noun && $0.Location == location
}
log.debug("Auto get for \(noun) returned \(item.count) results.")
log provides methods for outputting a string at various levels. Here I have used the debug level which
will show provided the minLevel is debug or higher (verbose). For the harder to debug issues, I might
use verbose level debugging:
if tmp != 0 {
    vIndex = VERB_GO
    nIndex = tmp
    log.verbose("Go verb found. Direction is \(verb) which translates to \(tmp)")
}
The level at which you log is entirely up to you. I tend to find I can stabilise my programs at the debug and verbose levels during development. For production running, it might make more sense to log to a file at a higher level.